Introduction
Modern AI research is rarely done locally. Whether you are fine-tuning LLMs or training diffusion models, you will almost always work on remote servers, and often on HPC (High Performance Computing) clusters.
A single server feels like a big computer without a GUI. But once you step into a Slurm cluster, the logic changes completely. Many new researchers get lost here, spending more time on setup and queue errors than on research.
The Core Thesis: Building effective Research Infra is not about memorizing Linux commands. It is about creating a reproducible, low-friction, and dependable workflow so you can spend more time on research itself.
This post walks through a battle-tested server workflow from scratch.
1. Understanding Slurm
The key idea of Slurm is separating resources from execution. You can think of a cluster as parts of a personal computer:
- Login node \(\approx\) keyboard and monitor: the only place you can operate directly. Do not run heavy jobs here.
- Storage \(\approx\) hard drive: a shared filesystem for code, data, and model weights.
- Compute nodes \(\approx\) GPUs: where real work happens, usually without direct internet access.
- Scheduler \(\approx\) OS kernel: allocates resources; you must request resources before running.
2. Access: SSH and Authentication
SSH is usually the first step. I recommend setting up key-based login, not only to avoid typing passwords, but also to keep tools like VS Code Remote stable.
Run on your local machine:
# 1. Generate a key pair (press Enter for defaults)
ssh-keygen -t rsa -b 4096

# 2. Copy public key to the server (appends to ~/.ssh/authorized_keys)
# You can also copy it manually if needed
ssh-copy-id user@your-server-ip
3. Conda Environment Management
Installing Miniconda under a large storage mount like /data or /share is the standard setup. The official guide is concise and reliable.
Note: Some HPC clusters provide software via module, e.g. module load miniconda or module load cuda. There is usually a local doc for this.
To balance reuse and stability, I recommend maintaining environments by research direction (e.g., a general ImageGen env) rather than by project.
# Create a general environment
conda create -n qwenImage python=3.12
conda activate qwenImage

# Install key packages once to ensure compatibility
pip install torch==2.5.1 torchvision deepspeed diffusers \
  numpy==1.26.4 opencv-python-headless bitsandbytes>=0.46.0 \
  einops gradio nvitop peft>=0.17.0 safetensors \
  wandb matplotlib sentencepiece modelscope \
  -i https://pypi.tuna.tsinghua.edu.cn/simple
4. Model Weights Download
On a cluster login node, use official CLI tools like huggingface-cli or modelscope.
Practical tips
- Mirror: in mainland China,
HF_ENDPOINTis essential. - Cache path:
HF_HOMEdefaults to~/.cacheand can quickly exceed home quota. Set it under/data, or just use--local-dir. - File filtering: use
--excludeto skip redundant formats (e.g.,.binand.safetensorsduplicates).
# Suggest adding to ~/.bashrc
export HF_HOME="/data/leimingkun/.cache/huggingface"

# Example download
export HF_ENDPOINT=https://hf-mirror.com
huggingface-cli download meituan-longcat/LongCat-Image \
  --local-dir LongCat-Image/ \
  --resume-download \
  --exclude "*.bin" "*.pth" # keep only safetensors to save space and time
5. Slurm Job Submission
Check overall cluster resources with sinfo:
[leimingkun@login01 ~]$ sinfo
PARTITION  AVAIL  TIMELIMIT  NODES  STATE NODELIST
A800        up     infinite   10     mix   a800-[001-010]
The key signal is the STATE, but mix does not always mean free GPUs. It can mean CPU is free while GPU is fully allocated. A simple check is scontrol show node a800-001, which shows GPU allocation in detail.
Use squeue to inspect running jobs, especially JOBID and ST:
[leimingkun@login01 ~]$ squeue -u leimingkun
JOBID PARTITION     NAME     USER ST       TIME  NODES NODELIST(REASON)
8726832  a800 interact leimingk  R 6-02:24:42      1 a800-003
On Slurm, there are three ways to request resources: salloc, srun (interactive), and sbatch (batch).
For long experiments, I do not recommend srun. It is easy to drop due to network issues, and harder to reproduce. sbatch is code, and it creates a clean record of your experiments.
Reference sbatch template (run_exp.sh):
#!/bin/bash
#SBATCH --partition=a800                 # Partition
#SBATCH --gres=gpu:1                     # Request 1 GPU
#SBATCH --cpus-per-task=16               # CPU cores
#SBATCH --mem=64G                        # Memory
#SBATCH --job-name=dit_train_v1          # Job name
#SBATCH --output=logs/%x_%j.log          # Log file
#SBATCH --time=3-00:00:00                # Max runtime (3 days)

# 1. Load environment
source ~/miniconda3/etc/profile.d/conda.sh
conda activate qwenImage

# 2. Run
python train_diffusion.py --config config/train.yaml
Submit with: sbatch run_exp.sh.
6. The Debugging Protocol
This is the most painful part for beginners: “It runs on the login node, but fails after submission. How do I debug?”
The cleanest solution is interactive debugging with salloc + tmux.
tmux essentials
Always start tmux before debugging so SSH drops do not kill your session:
tmux new -s debug_session: new sessionCtrl+B, thenD: detachtmux a -t debug_session: reattach
Debug flow
- Request resources with
salloc:
# Enter a compute node like a login shell
salloc -p a800 --gres=gpu:1 --cpus-per-task=16 --mem=64G
- Locate the node: the prompt usually changes (e.g.,
leimingkun@a800-002). If not, SSH into the allocated node. - Debug: you now have GPU access, and can use
python -m pdb train.py. - Release resources: use
scancel job_idorexit, otherwise you keep consuming quota.
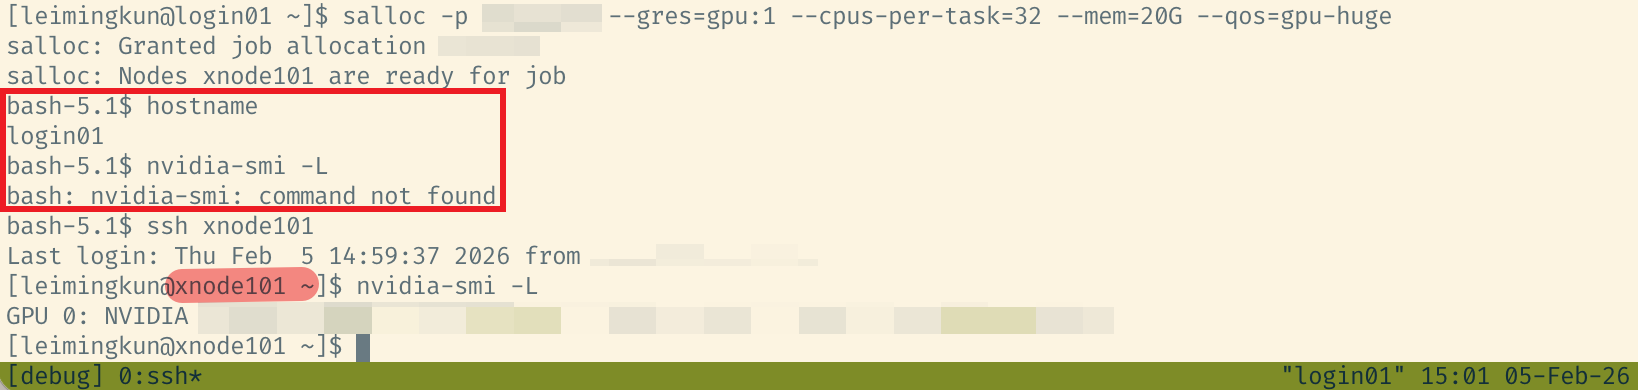
Figure 1. Debugging with salloc and a compute node
Summary
Once you master the chain: SSH Config (access) -> Conda (env) -> HF CLI (data) -> Slurm (compute), you have a solid Research Infra foundation.
In the next post, we will cover Observability: how to set up WandB and TensorBoard to monitor experiments running in remote black boxes.
Appendix: VSCode Remote-SSH
Cluster policies vary a lot:
- Some clusters provide a dev machine or allow VS Code on the login node. In that case, use Remote-SSH normally.
- Some clusters block VS Code on the login node and only allow compute nodes. Then you must configure
~/.ssh/config, often withProxyJump.
If you cannot reach a compute node directly and must hop through a bastion/login node, edit your local ~/.ssh/config like this:
# ~/.ssh/config example

# 1. Login node (jump host)
Host slurm_login
HostName 10.1.10.1
User leimingkun
Port 22

# 2. Compute node (via login)
# This lets VS Code connect for debugging
Host compute_node
HostName a800-001
User leimingkun
ProxyJump slurm_login